![]()
![]()
![]()
StoreMan is a combination of a comfortable backup
program and a db based archive manager. The software is ideal suited to store backup /
archive files on a (Free)NAS box and on USB disk drives (as well as on a local harddisks)
- and for searching files without the need to have the storage devices permanently online.
StoreMan is a Linux GUI - program, written in Python and using the wxWidgets
cross-platform Gui-library.
- Preliminaries
- Introduction
- The GUI
- Preferences
- Mount fs
- Backup tasks
- Backup jobs
- Scan directories
- Database
- Final note
To run StoreMan, you need Python >= 2.7.x (not 3.x) and wxPython 2.8.x.x or better installed on your computer. In addition it would be wise to install the following module (not needed, but nice to have):
- python-notify2: Python interface to the Freedesktop notifications system, which allows programs to display information to the user in an unobtrusive way. Notifications are sent over DBus to a notification daemon, which is responsible for presenting them to the user. If python-notify2 is not available in your distro, install the package python-notify.
- Psyco: hot spot compiler. Good to speed up various things (only on 32 bit systems), Psyco website
StoreMan has been tested on computers running Kubuntu Linux (KDE), Ubuntu Linux (GNOME) and Windows XP SP3.
Introduction
At the very first start of StoreMan, two files will be created in your
home directory:
- StoreMan.ini, which holds all program setting information (i.e. window size and position, defined jobs, defined tasks, name of the database and so on) and
- default.db3, which is an empty Sqlite StoreMan database
Later you can decide to store these files elsewhere on your computer.
StoreMan works with tasks and jobs. In short, a task holds the
information about what to do and the job holds the information about
when to do it. A job without an associated task is called useless.
Normally one or more tasks are associated with a job. A task can be
associated with more than one job. A job can be executed and runs the
task(s) associated with it. A task cannot be run without a job.
If you have already backup files stored on your storage device(s) it
would be a good idea to scan these devices first. The scan will collect
all relevant information (dir, filename, size, ...) and store these in
the database. To start the Scan manager, select Scan - Manage scan dirs
or type CTRL-S or use the context menu.
Secondly you may want to create one or more tasks. You do this
by
calling the Task Manager. This can be done by clicking Backup - Manage
task(s) or by typing CTRL-T or via the context menu - click the right
mouse button and choose Manage task(s).
In the Task Manager you click New to create a new task. A New / Edit
backup task dialog will pop up. You can change the default taskname,
set the source and destination paths for the backup, decide if
subdirectories should be included in the backup or not. You can edit regular
expressions to exclude files and / or directories from the backup and
you can select the compression method which has to be used.
Thirdly you may want to create one or more jobs. You do this
by calling the Jobs Manager. This can be done by clicking Backup -
Manage job(s) or by typing CTRL-J or via the context menu - click the
right mouse button and choose Manage job(s).
In the Job Manager you click New to create a new job. A New / Edit
backup job dialog will pop up. You can change the default jobname,
decide to mark the job for immediate execution or for scheduled
execution (or both), select date, time and interval for scheduled
execution and - most important - you can select, which of your
previously defined tasks should be associated with this job.
Now you are ready for a first backup run. If you have marked one or
more
jobs for immediate execution, these jobs are highlighted in the
Backup jobs sub-window. If you have not chosen one, you can do so by
clicking on the
job with the middle mouse button / wheel. After that, click on the
Immediate
Job Execution shortcut icon or menu or context menu. Now you are
set -
your job will be executed.
As a last step you may want to execute a query on the database (now holding
the information from the previously executed device scan and from the job
execution). You can press the shortcut Execute query icon or use the menu
or context menu. After a short delay (depends on the speed of your computer and
the number of entries in the database) you will see all information in the query
results window. You can now refine your query by using the filters.
...back to Contents
The GUI
StoreMan GUI has a main window for database Query results and 4
small sub-windows named Backup jobs, Scan dirs, Databases
and
Log messages. You can close and
reopen these small windows (using the View menu) or you can drag
these windows around and
place them at different positions either inside or outside the main frame.
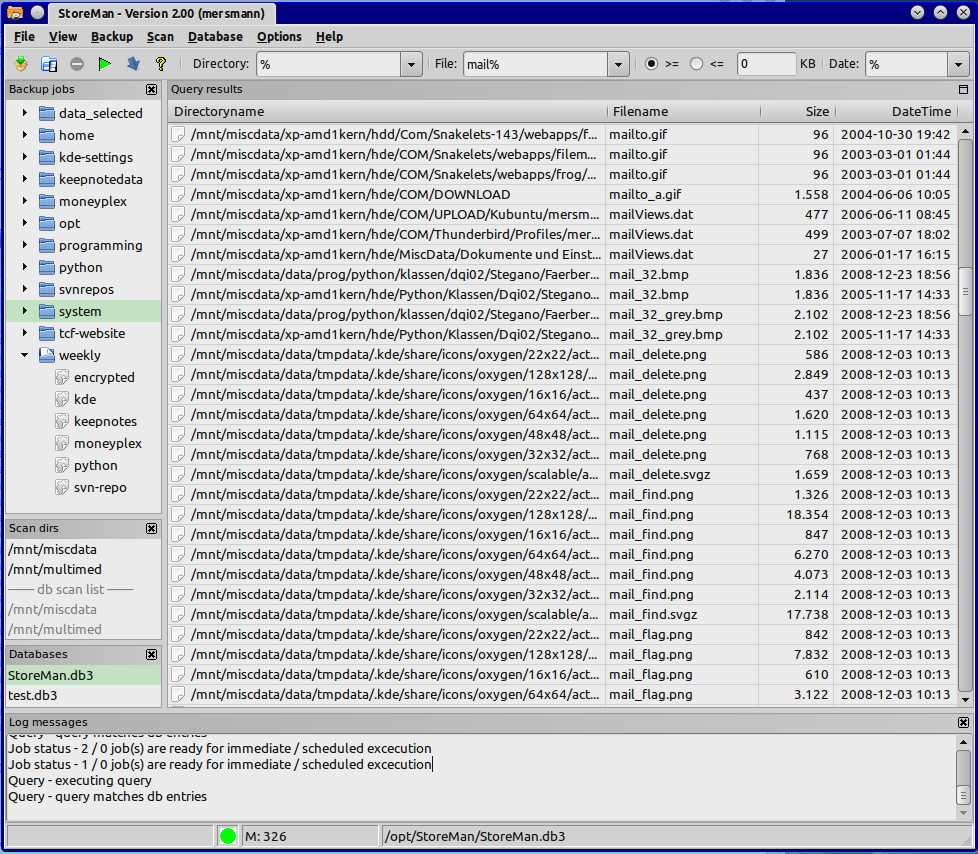
The main window includes a menu- and toolbar with shortcut icons for quick access of the most wanted actions. It also includes filter comboboxes with histories. Query filters are available to narrow down directory, file, size and / or date.

The % sign is the wildcard char in the filter fields. This char is
placeholder
for 0 to n chars. For example: %jpg matches 'jpg', 'picture.jpg' but
not 'abc.jpeg'. You can use 0, 1 or more wildcards in one field. %wil%
matches 'wildcard', 'wil', 'in_th_wild' and so on.
If you mark a line in the Query results window by clicking it, the directory part of that line is copied to the system clipboard. You may want to paste it into another application (i.e. a text editor).
If a line is marked, you are also able to delete the item from the storage device and from the database. This can be done via the File menu, by typing CTRL-R or via the context menu entry.
If you double click a line in the Query results window, the
preselected filemanger (see Program
settings - Listcontrol) will start and open the directory
which is the
first part
of the line.
And finally, the main window contains a statusbar divided into 4
fields. From left to right they are:
- quick help
- status led
- two multi function fields
The status led is implemented to help you to know, what's going on with the app (see table).
| led color | meaning |
|---|---|
| red | no connection to the selected database could be established |
| blue | scan is in progress |
| light blue | backup / copy job is being executed |
| yellow | database query in progress |
| light red | not all available matches are listed in the Query results window (see 'Preferences', 'Display limit') |
| green | ready - waiting for actions |
The first of the two multi function fields (field #3 and field #4) can indicate backup statistics (B:), matchcount (M:) or recordcount (R:).
- The B: in field #3 has 3 numbers for filesread count, skipped files count and error count. During execution of tasks of a backup job, field #4 lists the currently selected directory.
- The M: in field #3 shows the matched items as result of a database query. In this case, field #4 shows the path to the selected database.
- The R: in field #3 shows the number of items in the database
while scanning directories. In
this case, field #4 indicates the currently scanned directory.
See examples in table below.
| field #3 | field #4 | context |
|---|---|---|
| B: 1.207, 2, 1 | /data/prog/python/StoreMan | backup task running, 1207 files read, 2 files skipped, 1 error (i.e. unable to open) |
| M: 127 | /opt/StoreMan/storeman.db3 | database query executed, 127 matching results |
| R: 14.210 | /mnt/mpmd/home/mersmann | directory scan executing, 14210 entries are currently in the database. |
Preferences
Common program setup is done via the Preferences menu. To get to the
menu, use
'Options', 'Preferences', type CTRL-F or use the context menu (right
mouse click).
The Preferences notebook dialog has 4 tabs.
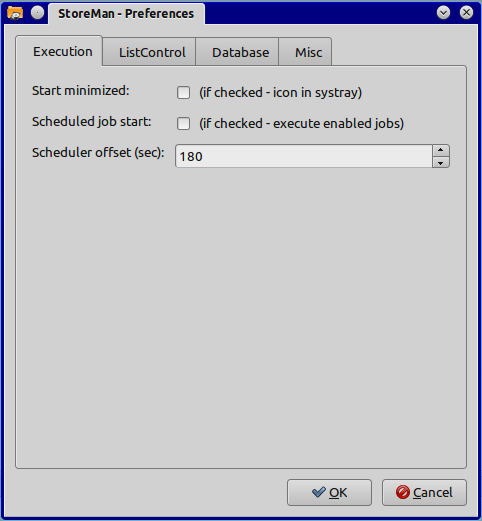
- Start minimized: if checked, the application won't start with a popping up main window. There will be a small icon in the system tray instead. This Icon has a context menu, where you can restore the application and so on. Default: not checked.
- Scheduled job start: if checked, all jobs with the 'Scheduled exec' flag set will be started immediately or after a scheduler offset time. This is the main on / off switch for scheduled mode. Default: not checked.
- Scheduler offset: this is the time in seconds, when the scheduler will fire up all jobs with the 'Scheduled exec' flag set. Default: 180 seconds.
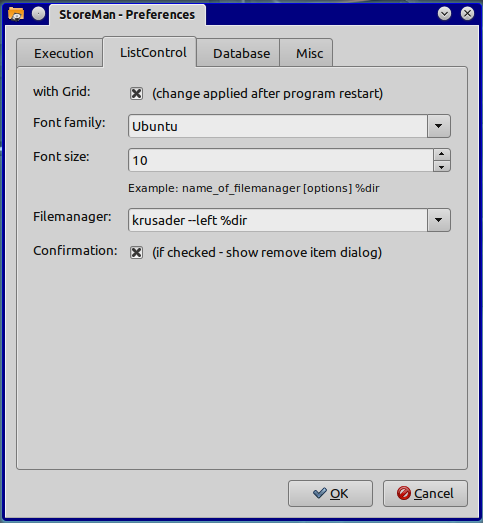
- With grid: when checked, the Query results window will have light horizontal and vertical lines between the rows and columns. Default: checked
- Font family: you can select from a list of all fonts, installed on your machine. Default: your selected system font
- Font size: you can select sizes from 6 to 12 points. Default: 9 points
- Filemanager: you can define a favorite file manager to be started by double clicking a line in the Query results window. Default: krusader.
- Confirmation: if checked, a remove item warning dialog will pop up, if you have selected an item for deletion in the Query results window. Default: checked.
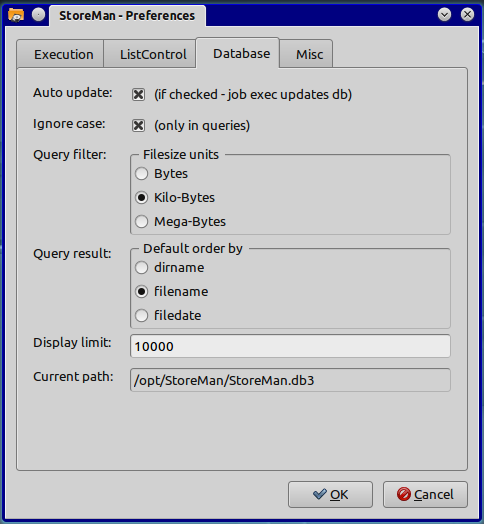
- Auto update: if checked, all files created by backup jobs and stored on your selected storage device are automatically written as new entries to the database. Default: checked. Be careful! If you uncheck this checkbox (not recommended), your database may get out of sync.
- Ignore case: Query results are ordered AB..Zab..z or AaBb..Zz (ignore case). Default: checked
- Query filter: for the file size query filter you can select Bytes, K-Bytes and M-Bytes (1 KB = 1024B). Default: K-Bytes
- Query result: Query results are ordered by one of the columns -
dirname, filename or filedate. Default: filename
You can temporarily change the sort order by clicking on the appropriate column header in the Query result window. - Display limit: maximum lines of query
matches to be shown in the Query result window. Default: 5000.
Example: Display Limit is set to 2500 and a query is made without any filter. Resulting matches are 14000 (status line field #3 will contain M: 14.000). In this case only the first 2500 matches are listed, but the status led will not turn to green - it will be light red instead. You can now sharpen your query by filtering or higher the display limit to 14000 and re-query. - Current path (read only): the currently selected database path. You can select the database via 'Database', 'Open database' or by double clicking an item in the Databases window. Default: /homepath/default.db3
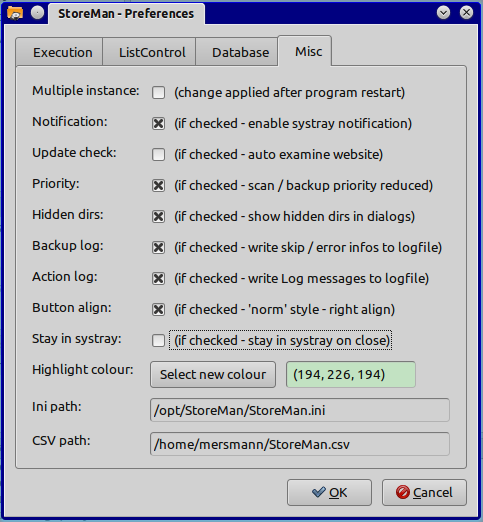
- Multiple instance: if checked, more than one instance of StoreMan is allowed to run. If unchecked, you can not start a second program instance. Default: not checked
- Notification: If checked, the StoreMan will contact the home server at startup. If a newer release is available, you will be informed so you can decide to run the update or not. Default: checked
- Update check: StoreMan can automatically check the website on startup if a new program release is available. Default: checked.
- Priority: you can reduce the cpu load during backups and scan runs. This helps other apps to respond more quickly but backups and scans are not as fast as possible - of course. Default: not checked
- Hidden dirs: show hidden / dotted dirs in directory selection dialogs (backup, scan). Default: not checked. You can override this in the corresponding dialogs.
- Backup log: during normal operation, there is no need for a logfile. But if you want to know, which files are skipped (i.e. as a result of an exclude mask) or result in an error (i.e. no right to read a file), you can check this checkbox. A logfile is placed in the users homedir. The name of the logfile is StoreMan-Backup.log. Default: not checked (see Logfile remark below)
- Action log: the messages from the Log messages sub-window are written to a logfile if checked. The logfile is placed in the users homedir. The name of the logfile is StoreMan-Action.log. Default: not checked (see Logfile remark below)
- Button align: if checked, buttons are aligned as it is default in GNOME or KDE. If unchecked they are centered und streched to fill the width of the dialog. Default: not checked
- Stay in systray: If checked, StoreMan will minimize to the system tray when the close button is pressed. In this configuration, exiting the application is possible by selecting 'File', 'Exit' or by pressing the shortcut CTRL-X. Default: not checked
- Highlight colour: you can select a highlight colour for the active database and the selected job for immediate job execution. Default: green
- Ini path (read only): Preferences are stored in a file called StoreMan.ini. Ini-file default directory is the users homepath, i.e. /home/username on Linux or C:\Documents and Settings\username\ on Windows. You can change this location by starting the application with the command line switch -i. Example: storeman.pyw -i=/tmp. Now the ini file is stored as '/tmp/StoreMan.ini'.
- CSV path (read only): the currently selected export file path. The contents of the Query result window can be exported to a file in csv - format. You can select the filename via 'File', 'Export matches' or by typing CTRL-E. Default: /homepath/StoreMan.csv
Note for Windows users: the StoreMan application does not put any values in the Windows registry.
Logfile remark:
Logfiles are written by a RotatingFileHandler with a maxBites size of 64 / 512
kB and a backupCount of 4 backups. Rollover occurs whenever the current
log file is nearly maxBytes in length. If backupCount is >= 1, the
system will successively create new files with the same pathname as the
base file, but with extensions ".1", ".2" etc. appended to it. For
example, with a backupCount of 4 and a base file name of "app.log", you
would get "app.log", "app.log.1", "app.log.2", ... through to
"app.log.4". The file being written to is always "app.log" - when it
gets filled up, it is closed and renamed to "app.log.1", and if files
"app.log.1", "app.log.2" etc. exist, then they are renamed to
"app.log.2", "app.log.3" etc. respectively. This is the same technique
as you might have seen in the /var/log dir of Linux systems.
The format of a logfile line is: date time [- taskname] -- message i.e.
Action-log (64 kB)
2010-02-09 09:42:49 -- DB-connect - database '/opt/StoreMan/test.db3' opened
Backup-log (512 kB)
2010-02-09 09:43:33 - weekly -- Skipped (exclude match): /home/mersmann/.bazaar/explorer/bookmarks.xml~
...back to Contents
Mount fs (feature only on Linux systems available)
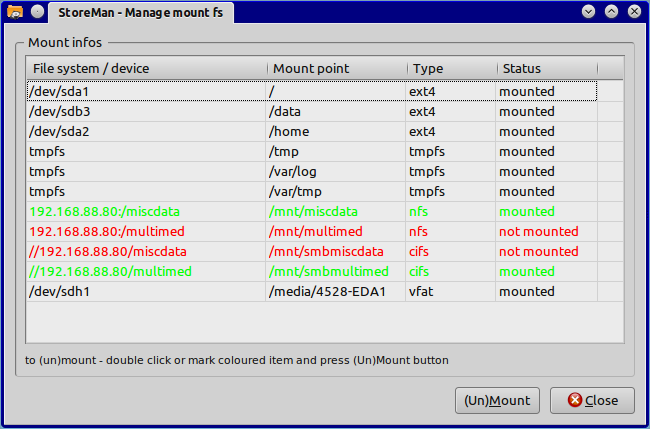
The screenshot shows 4 coloured entries. Items in red are mountable by StoreMan and items in green have been mounted by StoreMan. You can select one of these items and press the (Un)Mount button or you can doublecklick the item.
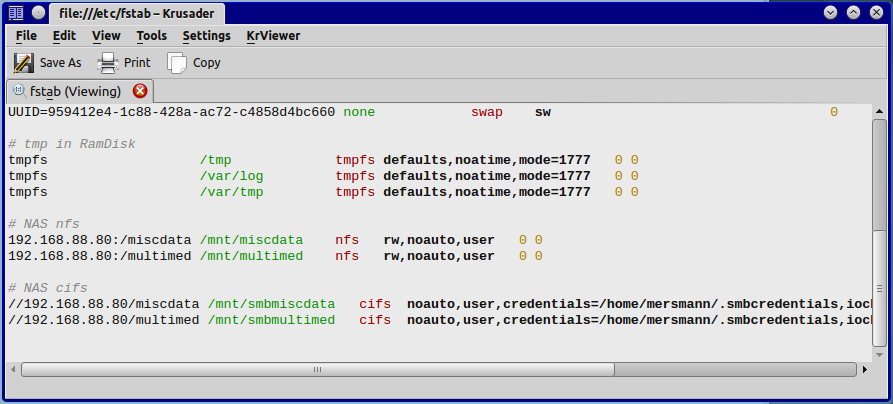
The next screenshot shows part of the fstab file:
...back to Contents
Backup tasks
The Manage tasks dialog is shown below.
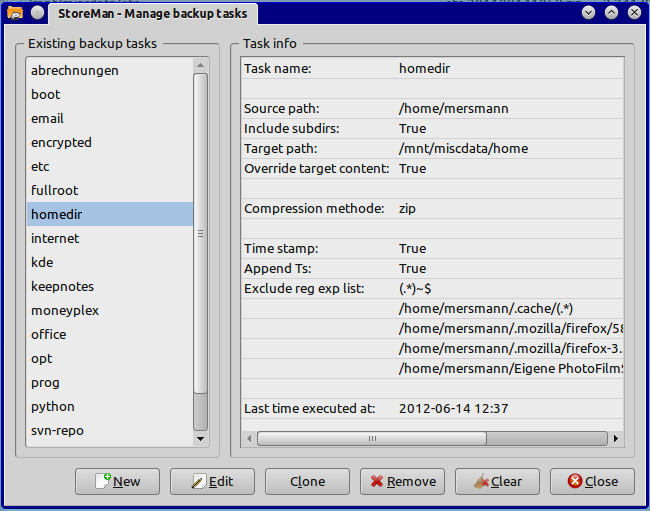
In this dialog you see the existing tasks in the left pane and all
information about the selected (highlighted) task in the right pane.
- New: creates a new task and adds it to the list. The default taskname is task-current_date_and_time - i.e. task-201001041841. The New / Edit backup task dialog appears.
- Edit marked task or double click in the left pane: the New / Edit backup task dialog appears.
- Clone: creates a copy of the selected task and adds it to the list. The taskname is replaced by clone_of_task-taskname - i.e. clone_of_task-homedir if 'homedir' was selected. The New / Edit backup task dialog appears.
- Remove: the selected task will be removed.
- Clear: be cautious! Clicking this button removes all tasks.
- Close: closes the dialog.
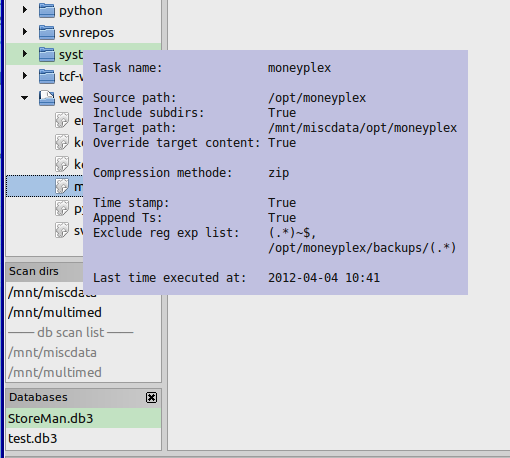
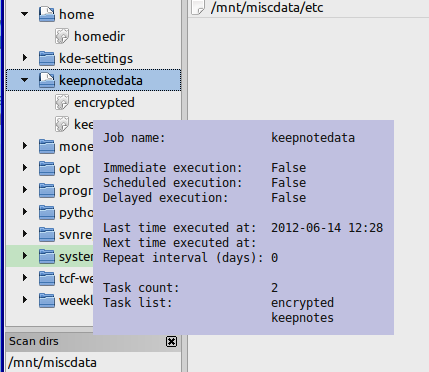
In the main window (Backup jobs sub-window part), you can gain access to quick information about a
task after expanding the job the task belongs to and by right clicking the task item. You can navigate in the Backup
jobs sub-window with the mouse, by typing the first char of a job- / taskname
and by typing the '+' (expand all jobs) or the '-' (collapse all jobs)
sign.
The New / Edit tasks dialog notebook has 5 tabs.
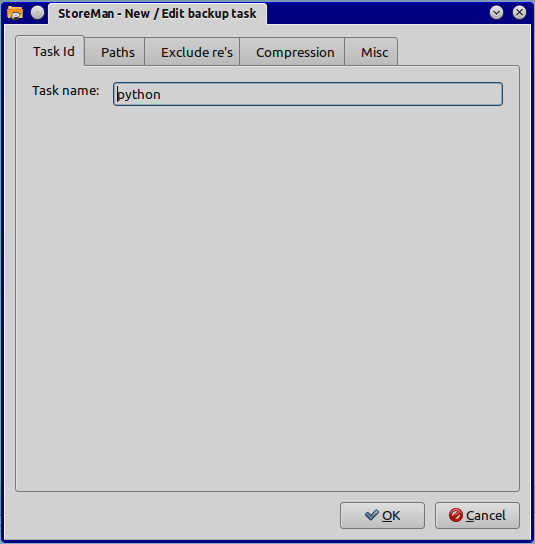
If the New / Edit backup task is started with New, you can change
the taskname in the Task Id tab from the default
task-current_date_and_time to a name that fits your needs. If the start
is via Edit, the taskname is not changeable.
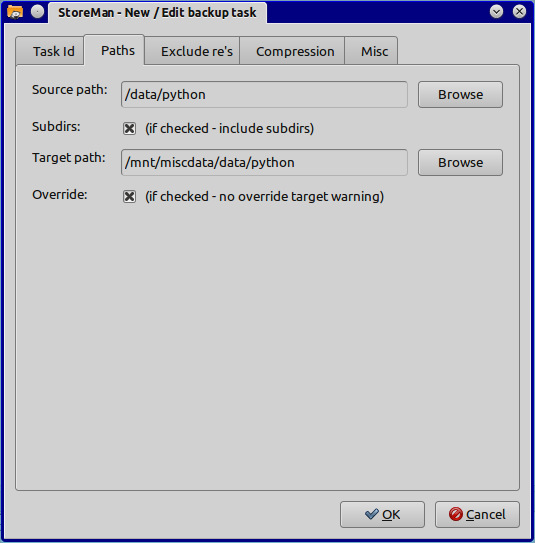
In the Paths tab you can
- select the source base path for the backup
- decide either to save or not to save the contents of subdirectories (note that Storeman never follows links)
- define where to store the backup (if you want to store on USB drives or other devices, you have to mount the devices first)
- decide to see a warning dialog if the danger of overwriting some files exists (see Compression and Misc tab).
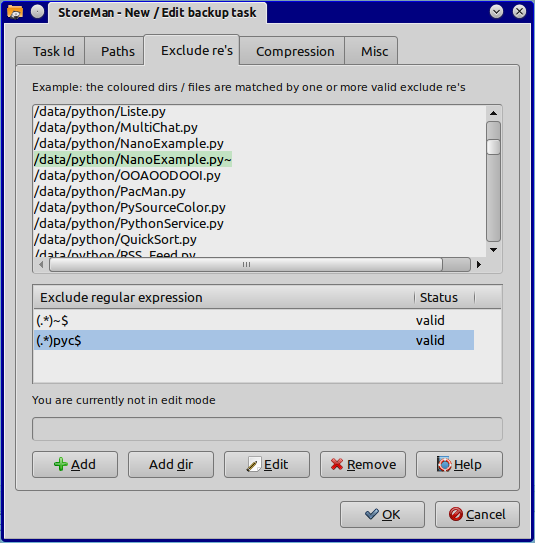
In the Exclude re's tab you can define which directories and / or
files should not be included in the backup. This is done via
regular expressions. If you press Add, Add dir or Edit and insert or edit a
regular expression and hit RETURN,
the expression is compiled and validated. If the expression is valid,
the status column indicates 'valid', if not, the status column shows the
word 'error' and the expression is shown in red.
In the upper part of the dialog files and dirs from the Source path (tab Paths)
are listed (wihout the contents of subdirs) as an example. The valid regular
expressions are applied and matching lines are coloured. So you can
test if the defined regular expressions fit your needs.
If you press the help button you will see a HTML page from the python
reference library with an explanation of the re grammar.
Remark: re's are always applied to the full expanded filenames (fefn).
Examples:
You want to save your /etc directory but do not want to save editor backup files with
the format 'name~' in your /etc dir, nor do you want to save the subdir
apt (files and subdirs) and last but not least you do not want to backup the dirs /etc/rc0.d,
/etc/rc1.d and so on.
The full expanded filenames (fefn) in this case are for example '/etc/fstab',
'/etc/vsftpd.user_list', '/etc/apt/sources.list' and so on.
You need three regular expressions to accomplish the mission:
| Regular expr. (re) | Explanation | Matching fefn |
|---|---|---|
| (.*)~$ or /etc/(.*)~$ |
The first '(.*)' says - skip all fefn starting with any char (the .), repeated 0..n times (the *). '~' says - the next char has to be a '~'. '$' says - now the line must end. | /etc/fstab~ |
| (.*)/apt/(.*) or /etc/apt/(.*) |
The first '(.*)' says - the fefn to be skipped has to start with any chars followed by '/apt/. The last '(.*)' says - skip any following chars. | /etc/apt/sources.list |
| /etc/rc.\.d(.*) or (.*)/rc.\.d |
In this example the matching fefn has to start with '/etc/rc'. The '.' says - now skip one char. To match a '.' in a file or dir name you have to escape the '.' because of its special re meaning. Escaping is done by the '\' - so we have to type '\.'. The next char has to be a 'd'. A third alternative is the re '/etc/rc.\.d/(.*)' and there are more. | /etc/rc5.d/README |
If you want to know more about regular expressions, search the internet for this topic, i.e. http://gnosis.cx/publish/programming/regular_expressions.html or press the Help button on the Exclude re's tab for the re syntax.
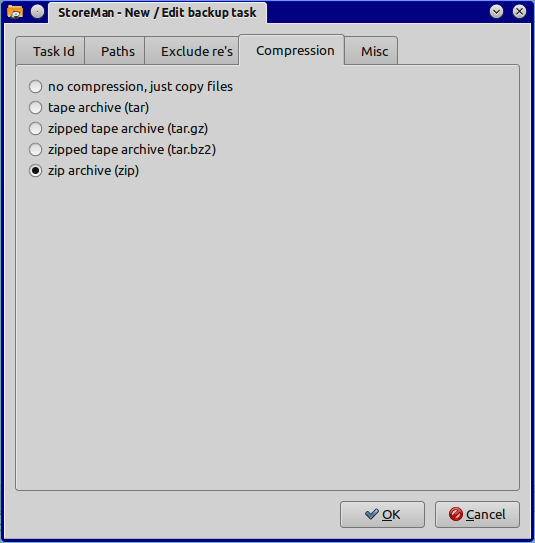
On the Compression tab you decide either to use (create archive) or not to use compression (only copy
files). If you want to use
compression, you have the choice of several methods. In the latter case
the next tab is activated.
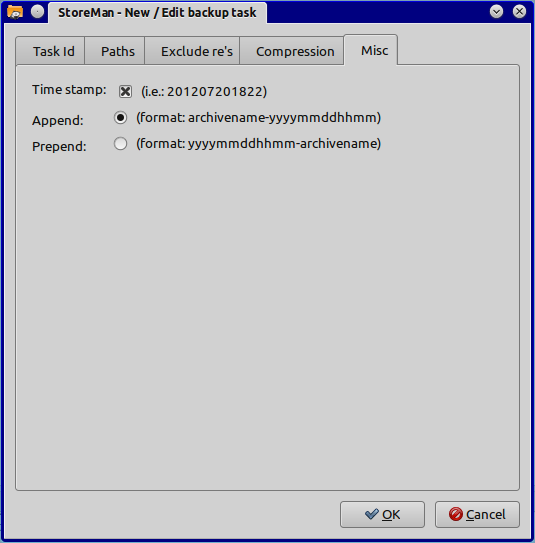
In the Misc tab you can choose if your compressed backups (archives) are to be
prepended or appended by a date - time - stamp. This is very useful,
because if you decide to use the stamp, there is no danger for
overwriting an older file - except you run the same job twice in the
same minute.
...back to Contents
The Manage jobs dialog is shown below. The dialog is similar to the Manage tasks dialog.
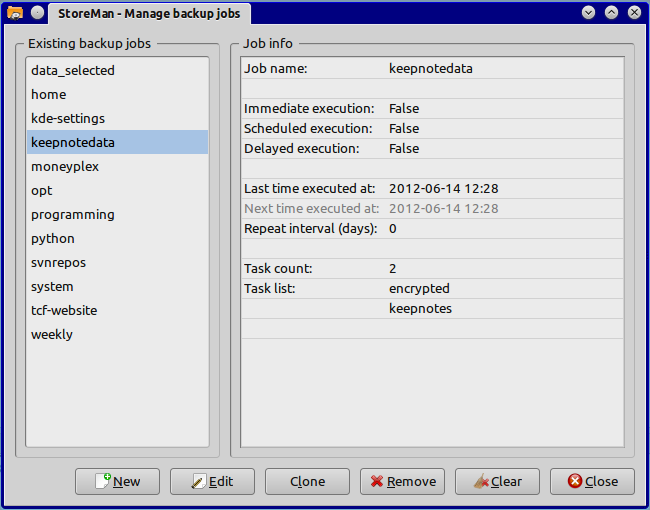
In this dialog you see the existing jobs in the left pane and all
information about the selected (highlighted) job in the right pane.
- New: creates a new job and adds it to the list. Its default taskname is job-current_date_and_time - i.e. job-201001041841. The New / Edit backup job dialog appears.
- Edit marked job or double click in the left pane: the New / Edit backup job dialog appears.
- Clone: creates a copy of the selected job and adds it to the list. The jobname is replaced by clone_of_job-jobname - i.e. clone_of_job-system if 'system' was selected. The New / Edit backup job dialog appears. If more than one job was selected, the first one will be used as the template to create the copy.
- Remove: the selected job will be removed. Removing a job does not delete the possibly associated task(s).
- Clear: be cautious! Clicking this button removes all jobs.
- Close: closes the dialog.
In the main window you can gain access to quick information about a job by right clicking the item in the Backup jobs sub-window. You can navigate in the Backup jobs sub-window with the mouse, by typing the first char of a job- / taskname and by typing the '+' (expand all jobs) or the '-' (collapse all jobs) sign.
The New / Edit jobs dialog notebook has 3
tabs.
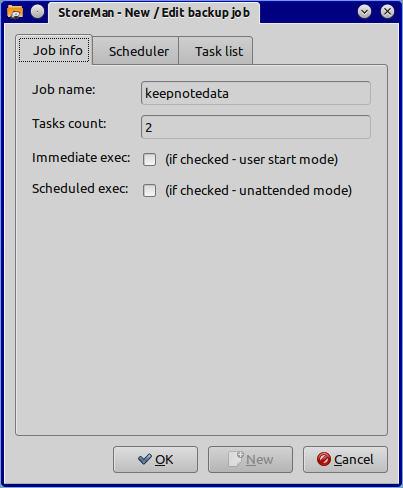
- If the New / Edit backup job is started with New, you can change the jobname in the Job info tab from the default job-current_date_and_time to a name that fits your needs. If the start is via Edit, the jobname is not changeable.
- Tasks count: this line informs you how many tasks currently are associated with this job.
- Immediate exec: if checked, the coresponding job is highlighted in the Backup jobs window. These jobs can be run by clicking on the Immediate job executing icon or by typing SHIFT-CTRL-J.
- Scheduled exec: if checked, the job is in scheduled mode and will be run at a predefined date and time (see next tab). Precondition is, that the 'schedule main on / off switch' is switched to on. If that switch is switched to off, scheduling is disabled for the whole application. The schedule main switch is on the Execution (first) tab of the preferences dialog and is labeled 'Scheduled job start'.
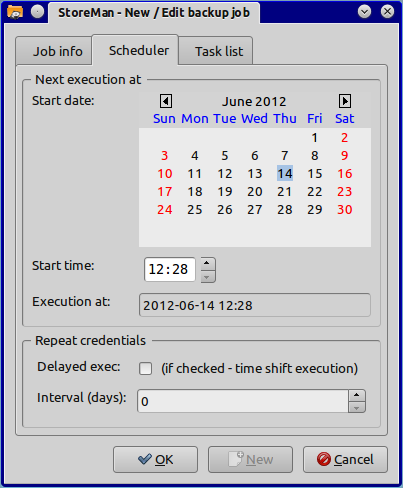
In the Job execution tab you can
- select the start date and time for the execution of the job. This is done by using the calendar and the time control. The line underneath the calendar control is the (read only) date and time summary.
- give Repeat credentials for the job. If delayed exec is checked, the job will start after a delay of n seconds. The concrete value is set in the Preferences - Execution tab. With Interval days you decide how often the job will be executed. 0 means - the job execution will not be repeated.
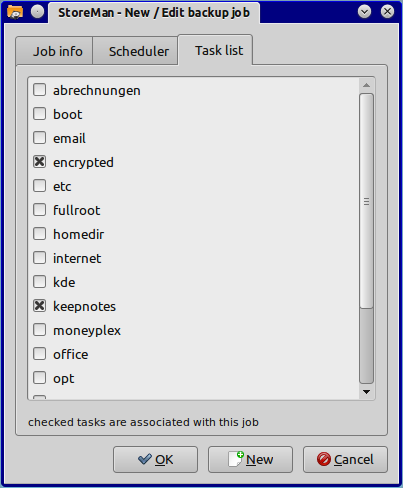
In the Job task list tab you determine, which of the defined tasks will be associated with this job. A job with 0 tasks is useless. You may connect 1 or more tasks to a job by clicking the appropriate checkbox.
The New button is a shortcut to the New / Edit backup task dialog.
...back to Contents
Scan directories
The Manage scan dialog is shown below.
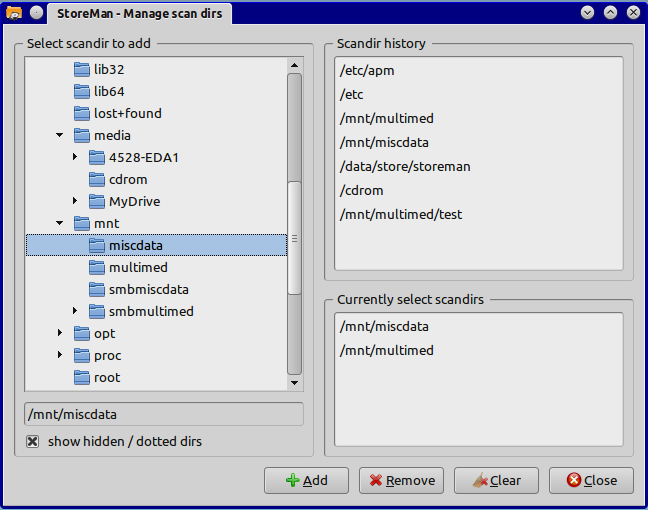
In this dialog you see the directory tree of your system in the left
pane, a history of previously selected dirs in the upper right pane (for quick navigation) and
the currently selected scandirs in the lower right pane.
- Add: adds the highlighted dir of the tree to the currently selected scandirs.
- Remove: the selected dir will be removed.
- Clear: be cautious! Clicking this button removes all currently selected scandirs.
- Close: closes the dialog.

The Scan dirs sub-window shows in the upper part the dirs currently
selected for a scan run. This information is saved in the INI file.
In the lower part the window lists the dirs that are already scanned. This information is stored in the currently used database.
If you execute the defined scan ('Scan', 'Execute scan' or type
SHIFT-CTRL-S), all directories are scanned
recursively and the
filenames (with dir info), sizes and creation dates are stored in the
database for queries.
Important: You should execute a scan on a non empty storage
devices, before executing a backup job. So the database will be in sync
with your storage device.
...back to Contents
StoreMan uses a built-in standard Sqlite database to store backup
information. You can inspect the interior of the database (if you like) with any Sqlite database
tool, i.e Sqliteman (http://sqliteman.com/).
Database handling is done byYou can select a database via the Database menu, by typing CTRL-O or by
double clicking on an item in the Databases sub-window. Database(s) store information
about scanned devices and backup runs - NOT the backup data.
The Manage database dialog is shown below.
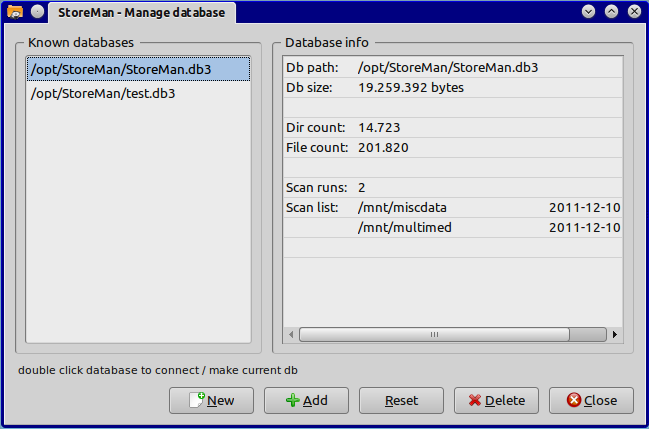
The left pane lists the Known databases. The right pane shows information about the selected database.
- New: creates and adds an empty database to the list.
- Add: selects and adds an existing database to the list.
- Reset: resets / initializes a database that must exist. Even the currently active database may be reset.
- Delete: removes a database from the list and you will be asked if you want to erase the database file from storage. It is not allowed to delete the currently active database.
Remark: You can make a database to the currently active database by double clicking on the name in the left pane of the database manager or by double clicking on the name in the database sub-window.
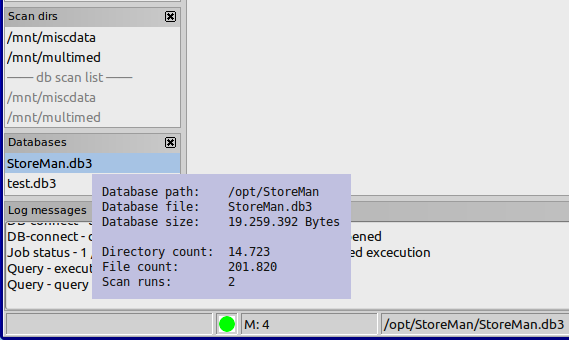
In the main window, you can gain access to quick information about a
database by right clicking the item in the Databases sub-window.
Final note
All screenshots shown in this document, are taken from StoreMan 2.0x running on Linux (Kubuntu 12.04, KDE 4.8.x).
If you like the software, use it (at your own risk). If you have
suggestions or encounter bugs - please send me an email. If you do not
like the software - throw it away.
- Guido van Rossum for the great Python programming language
- the wxWidget team for their cross-platform GUI Library
- the wxPython team for their Python wx wrapper, used to create the GUI of StoreMan
- Michael Foord and Nicola Larosa for their excellent configobj module, used to read / write the program settings
- the CherryPy people for their cherrytemplate module used for printing
 |
 |
StoreMan was designed and coded by Frank Mersmann
(frank.mersmann@gmail.com).
Beta tests where conducted and hints were made by Wolfgang Bredow
(bredow.w@googlemail.com).
2.00.20120720